Common error & Current Limit
Update time:2018-04-13 Views:4926
Common mistakes
Due to equipment did not enter to upgrade mode upload failed
The solution:According to the following steps,Make Fireduino into the upgrade mode。
Press the lower left corner of the UPGRADE button,Don't loosen。
Short press the RESET button, until PC finds unknown equipment, release the UPGRADE button.(Generally 3 seconds will find the unknown device, if long time not found, please loosen the button to retry again)。
Owing to lack of user permissions to upload failed
The solution:right-click the program icon ,in the right-click menu, select "run as administrator"。
win10 install Rockusb driver failed
The solution:
As shown in the figure below, click on the "Settings"
Click on "update & security"
Click on "Recovery" ,in the appeare interface,click on "Advanced start-up",then chick on"Restart now"
After the computer restart, click on the "Troubleshoot" in the following interface
Click the "advanced options"
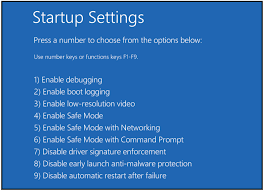
Click on "Start-up Settings"
Click on the "Restart"
After the restart, enter the following interface, press the number seven, option to select the seventh
This time the computer will automatically restart, after the restart,accordance with the method of install the driver before,you will succeed。
Existing restrictions
The GPIO of Fireduino will not be able to select the pull up and down when input,its built-in have fixed the up and down direction,if you need to turn on this function,can according to the following table configuration pull function of GPIO,and you can continue to use the configuration method of Arduino to configuration pull up and down,its actual function is for pull function of GPIO.
GPIO pull direction
| PIN | Sliding direction | PIN | Sliding direction | PIN | Sliding direction | PIN | Sliding direction |
|---|---|---|---|---|---|---|---|
| 0 | pull up | 8 | pull down | 14 | pull up | 23 | pull up |
| 1 | pull up | 9 | pull up | 15 | pull up | 24 | pull up |
| 2 | pull down | 10 | pull up | 16 | pull up | 25 | pull up |
| 3 | pull up | 11 | pull up | 17 | pull up | 26 | pull up |
| 4 | pull down | 12 | pull up | 18 | pull up | 27 | pull down |
| 5 | pull down | 13 | pull up | 19 | pull up | ||
| 6 | pull down | 28 | pull up | 20 | pull up | ||
| 7 | pull down | 29 | pull up | 21 | pull up | ||
| 22 | pull up |
Analog pin (A0~A7) of Fireduino can't be used as digital pins,only can be used in the ADC data acquisition,and analog input voltage must be less than the reference voltage of 2.55V.The reference voltage of Fireduino is not available,the fixed at 2.55V.
All analog pins of Fireduino can be used as PWM output pin,for the software timer implementation,there will be some small deviation (< 1%).The PWM duty cycle the adjusting range of 0~255,the frequency of 556Hz.
External interrupt,trigger mode of Fireduino also have four,but four patterns for low level trigger,high level trigger,rising edge and falling edge trigger,there is no level change triggered interrupt options.


