Flash Image of Android ( eMMC )
Update time:2018-04-04 Views:1733
Foreword
This article describes how to host the firmware file , burned to the development board eMMC flash memory through the USB male to male data cable (hereinafter collectively referred to as USB data cable). When upgrading, you need to select the appropriate upgrade method according to the host operating system and firmware type.
Note:
every time you upgrade the Linux firmware you must enter the 《MaskRom mode》
In
addition, if eMMC is a Linux system and you want to replace the Android
system, so you also need to enter the MaskRom mode to upgrade.
In the case of you only have the SD card,
Refer to 《Make Android SD Card to Startup System》, 《Make Linux SD Card to Startup System》 these articles to make system boot card.
Prepare
ROC-RK3328-CC dev board
Good USB male to male data cable
Windows
Install RK USB Driver
Connect the Device
The device enters upgrade mode : see 《Boot Mode》Loader mode
The device enters MaskRom mode : see 《MaskRom》
Compile Firmware
1、Refer to《compile android7.1 firmware》to complete the compilation of the code, and the Image will be generated in the rockdev/ image-roc_rk3328_cc_box/。
2、Click here to obtain the official script compression package. decompress it in the rockdev/ image-roc_rk3328_cc_box/, run the following command to package the image in the directory as the unified firmware.
./sd_rk3328.sh
Write the Firmware into the Board
TOOL: AndroidTool download link :AndroidTool链接
1) burn the uniform firmware update.img
Premise:the device is in the MaskRom mode.
The steps are as follows:
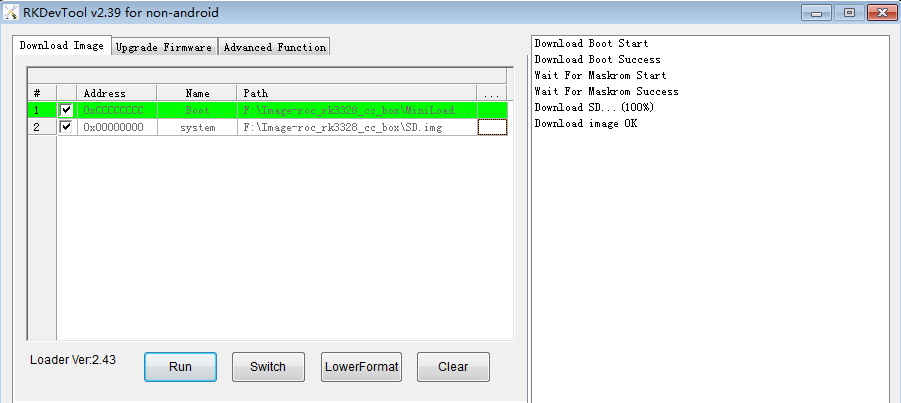
1、Switch to "download firmware" page.
2、Put MiniLoaderAll. Bin in the first upgrade, address 0xCCCCCCCC.(Or use AndroidTool default bin file)
3、Put the SD. Img in the second upgrade with the address 0x00.
4、Click "Run" is OK
5、After the upgrade is completed, the device will be restarted automatically.
Burning success, show as the following figure:

Write Partition Image into the board
The steps to burn the partition image are as follows:
Premise:The device is in the Loader Mode
Please:Refer to the following method: use the upgrade_tool tool for partition burning.
Linux
RK provides upgrade_tool, a command line tool under Linux, to support the burning of the unified firmware update. Img and partition mirroring.
The open source tool has two options:
1、Rkflashtool https://github.com/Galland/rkflashtool_rk3066
2、Rkflashkit https://github.com/linuxerwang/rkflashkit
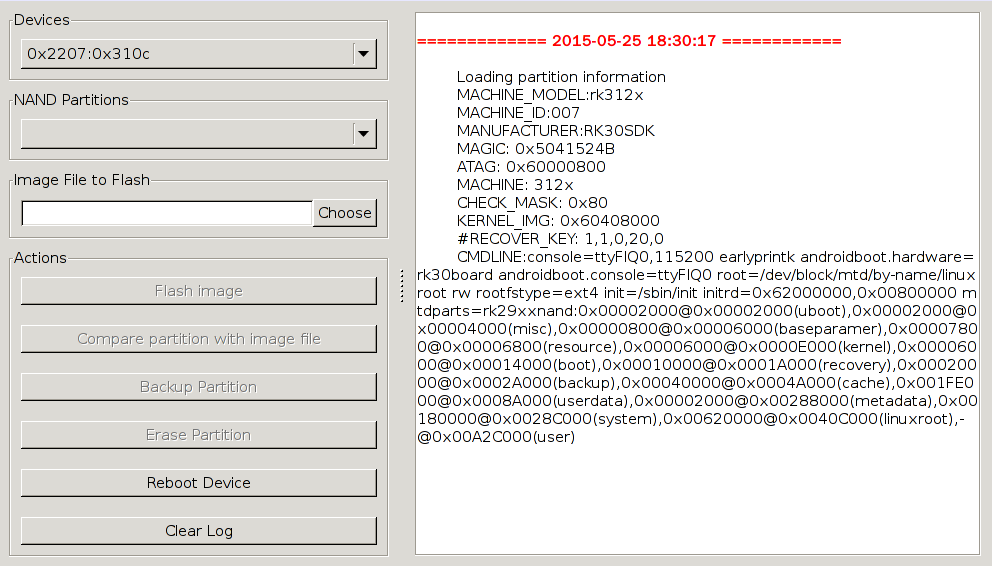
They only support partition image burning and do not support uniform firmware. Rkflashtool is a command line tool. Rkflashkit has a graphical interface, which is supported by the command line. The following is only an introduction to rkflashkit.
Linux does not need to install the device driver, see the 《Boot Mode》Loader mode
upgrade_tool
In the SDK, RKTools/ Linux /Linux_Upgrade_Tool/ get the latest version or download Linux_Upgrade_Tool and install it to the system as follows:
   tar -xzvf upgrade_tool_v1_26.tar.gz
   sudo mv upgrade_tool /usr/local/bin
   sudo chown root:root /usr/local/bin/upgrade_tool
Note: if the following error is prompted:
upgrade_tool: error while loading shared libraries: libudev.so.1: cannot open shared object file: No such file or directory
Ubuntu can be resolved using the following command:
sudo ln -sf /lib/i386-linux-gnu/libudev.so.1 /lib/i386-linux-gnu/libudev.so.0
Or directly use the lib library in Linux_Upgrade_Tool and copy it to /lib/i386-linux-gnu/ directory.
sudo cp lib/i386-linux-gnu/* /lib/i386-linux-gnu/
Burn Unified firmware update. Img:
sudo upgrade_tool uf update.img
Burn write partition mirror:
   sudo upgrade_tool di -b /path/to/boot.img
   sudo upgrade_tool di -k /path/to/kernel.img
   sudo upgrade_tool di -s /path/to/system.img
   sudo upgrade_tool di -r /path/to/recovery.img
   sudo upgrade_tool di -m /path/to/misc.img
   sudo upgrade_tool di resource /path/to/resource.img
   sudo upgrade_tool di -p paramater               # burn parameter
   sudo upgrade_tool ul bootloader.bin             # burn bootloader
   sudo upgrade_tool di trust /path/to/trust.img   # burn trust
If there is an error caused by the flash problem, try low-level formatting, erasing flash:
   sudo upgrade_tool lf   # Low-level formatting
   sudo upgrade_tool ef   # erase
rkflashkit
Installation:
   sudo apt-get install build-essential fakeroot
   git clone https://github.com/linuxerwang/rkflashkit
   cd rkflashkit
   ./waf debian
   sudo apt-get install python-gtk2
   sudo dpkg -i rkflashkit_0.1.4_all.deb
Graphical interface:
sudo rkflashkit

The command line:
$ rkflashkit --help
Usage: <cmd> [args] [<cmd> [args]...]

part                              List partition
flash @<PARTITION> <IMAGE FILE>   Flash partition with image file
cmp @<PARTITION> <IMAGE FILE>     Compare partition with image file
backup @<PARTITION> <IMAGE FILE>  Backup partition to image file
erase  @<PARTITION>               Erase partition
reboot                            Reboot device

For example, flash device with boot.img and kernel.img, then reboot:

sudo rkflashkit flash @boot boot.img @kernel.img kernel.img reboot
Help in using the sample information, it can be seen that a command can burn write multiple image files and restart the equipment, the need to compile and often burn write kernel developers, is a boon.
FAQs
Q1: How to force into MaskRom mode?
A1: If the board can not enter the Loader mode, booting from SD card also fails, you can try to force enter the MaskRom mode.Please see the operation method《MaskRom mode》。


